![Halda Logo Black Tight-2.svg]](https://info.halda.ai/hubfs/Halda%20Logo%20Black%20Tight-2.svg)
The following article discusses all steps needed to configure your Halda Email Campaign. Before getting started, you will need to confirm you have all the following:
- Slate is your CRM.
- Email Integration is complete.*
- AI Campaigns are turned on for your Halda account (this can be confirmed with your Account Manager).
- You have a list of prospects with the following information ready to upload for the campaign:
-
First Name
-
Optional: Preferred Name
-
-
Last Name
-
Email Address
-
Student Status
-
Slate Reference ID
-
Record Created at Date
-
Information for Personalization
- Simulation works best when we have at minimum 5 data points and works best when you have 8 or more Data points for each student
- Data points should cover both “explicit” and “implicit” categories
-
- Explicit: Data points that you would openly use to personalize a communication to a student (e.g. major of interest, extra curricular interest, Admission status, state of residence, etc)
- Implicit: Data points you would not usually share directly with a student, but may shape how you speak to a student (e.g. Enrollment Model Scores, Financial Aid Modeling outputs, Email Interaction History, etc.)
-
- Data Points should also span four key categories.
- Geographic (e.g. state of residence)
- Temporal (e.g. entry term or age)
- Behavioral (e.g. visit history interaction data point)
- Interest Based (e.g.academic interests)
-
Helpful Hint: You will not be required to use every data point during campaign creation. It is easier to exclude things later, than to have to add more later for each student.
*If your email campaign integration is not configured, reference this article for setup instructions.
Step 1: Upload Your List
There are two ways that you can upload the records for your campaign. The first way to upload the list of students for your campaign is by navigating to the Student Records tab. Once on this page, click the "Import" button in the top right corner.
.png?width=670&height=59&name=Untitled%20design%20(56).png)
Clicking this button will open the Student Record Import section of the Halda app where you will be prompted to take the following actions:

The second option for uploading your list is going into a new campaign and selecting the "Create New Audience" button in the Select Audience dropdown. This will redirect you to the Student Record Import section of the Halda app.
.png?width=670&height=338&name=Untitled%20design%20(58).png)
Upload CSV
Fields to include: Think carefully about what your objective and what types of data points influence how you would speak differently to students. Your AI Campaign Agent is similar - it requires those fields to craft truly individualized emails.
For example:
-
- Do you speak with students from different states differently? You may want to include "state" in the data set.
- Does a student's visit (on campus or virtual) history (volume, type, recency) change the ways you talk to them.
- Does their program of interest change the conversation?
- Does status inform your talking points? Might you speak abut your institution to a sophomore prospect differently than a senior inquiry.
Required fields for your upload include: First Name , Last Name, Email Address, Student Status, Slate Reference ID, Record Created at Date , and Information for Personalization.
If you need help determining what personalization information to use, consult with your Account Manager.
How to name fields in the .csv.
-
- Halda's data ingestion tool uses AI to make intelligent field mapping/field creation recommendations. We recommend avoiding overly generic .csv column titles like "GUID" as these could lead to additional human intervention and could be confused multiple field options between Slate and Halda.
Map Fields
In this step, you will match the fields from your file import with existing fields in Halda. This will ensure that data is used correctly in the email generation and delivery step of the campaign.
Review & Confirm
Confirm that values have been mapped correctly.
Name Your Import
In order to differentiate your different audiences, it is critical that you name your audiences in a fashion that makes it easy to identify who that specific list contains. For example, "List 1" is too vague and may lead to future confusion when building campaigns. A better name could be "In-State Undergraduate Prospects for 2027."
Import Complete
After completing these steps, your import will be complete and you are ready to move onto the configuration of your campaign.
Step 2: Configure Your Campaign
Once your inquiry list has been uploaded into the Halda app, you will be able to configure your campaign. To get started, navigate the the AI Student Recruiter section in the left hand navigation menu and select "email Campaigns."

Once in this section, click on the blue "Configure New Campaign" button in the top right corner. This will open up the campaign builder where you will be prompted to input a campaign name and description as well as confirming which Slate connection the campaign should be sent through:

After inputing the name, description, and selecting the correct CRM connection, click the "Create Campaign" button.
Campaign Overview
Define your campaign type, audience, and goals.

CTA Selection
Configure the calls-to-action for your campaign emails.Choose your primary and secondary CTA . You can opt to have AI create and optimize the CTA text in the email or use default values you input.

Email Facts
Review the knowledge base used to generate personalized emails.

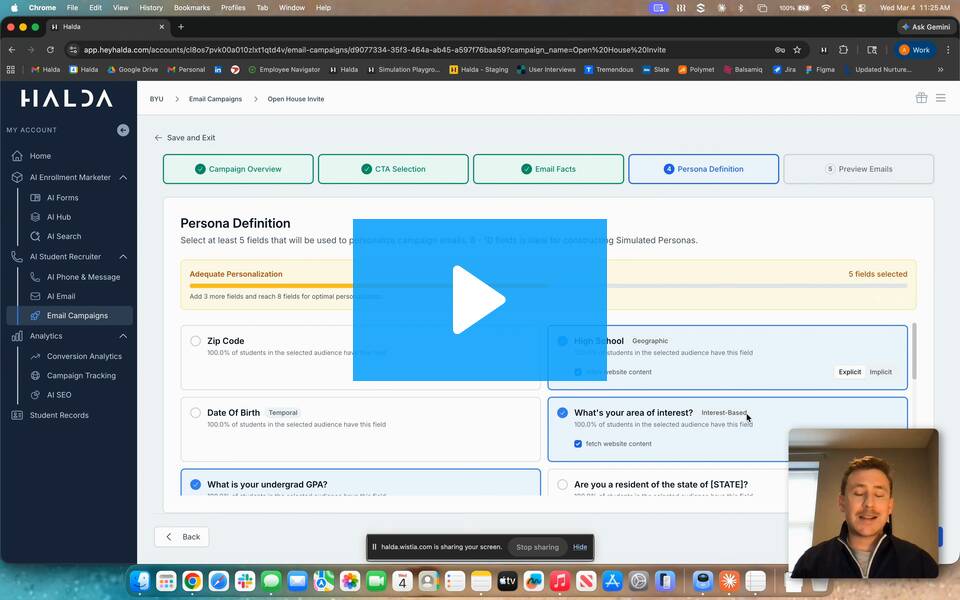
Persona Definition
Select at least 5 fields that will be used to personalize campaign emails. 8 - 10 fields is ideal for constructing Simulated Personas.

Preview Emails
You will be able to select a student record and preview what their email content would look like based on the campaign prompt. You will be able to adjust the prompt if the email previews do not reflect your desired outcome.

Step 3: Test Your Integration
Before activating your campaign, you will need to update the mailing filters in Slate for your campaign email to include the Campaign ID. You can find this ID in the Email Campaign page:
.png?width=504&height=179&name=Untitled%20design%20(59).png)
Once that has been applied to the mailing query, you will also need to configure your query export to include that name of the campaign.
After these steps are completed, your Account Manager will help send a test email to an existing test lead in your Slate instance to confirm everything is working.
Step 4: Publish Your Campaign
After configuring both the campaign settings and CRM, you are ready to publish the campaign inside of Halda.
Select the "Start" button on the campaign card:

Input your delivery schedule. You can choose between a fixed interval and custom interval for email delivery.

Select "Save Schedule" and review your campaign details. Type "Start Campaign" to confirm and click the "Start Campaign" button.

Once your campaign is live, the following actions and views will be available to update and manage the email campaign:

If you have any questions about configuration or testing, reach out to your Account Manager.